
Details
| Start point | |
| Official difficulty | Intermediate |
| Description | Forgettable Tale of a Drunken Dwarf is part 2 in the Rise of the Red Axe series, focusing on the dwarves and their capital city of Keldagrim. After the events in The Giant Dwarf, the Red Axe mining company has departed the city and set up a new headquarters in a remote underground location.
Veldaban, the Commander of the Dwarven Black Guard in Keldagrim, wants you to investigate the case and find out if the Red Axe is planning anything nefarious. The problem is, the only lead he's got is an extremely drunken and kebab obsessed dwarf. Use your farming and brewing abilities to your advantage, then prepare to be perplexed by puzzles as you follow the trail to the Red Axe... |
| Length | Long (40+ minutes of waiting) |
| Requirements | |
| Items required |
Recommended
|
| Enemies to defeat | None |
Walkthrough
Items required: Beer (or 2 coins to buy one)

Head to ![]() Keldagrim. A great way to get there is by using the
Keldagrim. A great way to get there is by using the ![]() Minigame Group Finder teleport to
Minigame Group Finder teleport to ![]() Blast Furnace. Another great way is to use the cart trapdoor in the north-western part of
Blast Furnace. Another great way is to use the cart trapdoor in the north-western part of ![]() Grand Exchange. The
Grand Exchange. The ![]() fairy ring code dks will bring you right next to the entrance to Keldagrim. There are also cart rides from the
fairy ring code dks will bring you right next to the entrance to Keldagrim. There are also cart rides from the ![]() Dwarven Mine, the underground
Dwarven Mine, the underground ![]() White Wolf Mountain passageway, and
White Wolf Mountain passageway, and ![]() Dorgesh-Kaan (if you completed the quest
Dorgesh-Kaan (if you completed the quest ![]() Another Slice of H.A.M.).
Another Slice of H.A.M.).
To start this quest, talk to ![]() Veldaban, Commander of the
Veldaban, Commander of the ![]() Black Guard in the Black Guard H.Q., west of the Keldagrim bank. He is rather shocked to tell you that, after the incident at the end of
Black Guard in the Black Guard H.Q., west of the Keldagrim bank. He is rather shocked to tell you that, after the incident at the end of ![]() The Giant Dwarf, the
The Giant Dwarf, the ![]() Red Axe company has left Keldagrim and will soon be kicked out of the
Red Axe company has left Keldagrim and will soon be kicked out of the ![]() Consortium.
Consortium.
However, he finds it rather suspicious and wants you to investigate the mining group. The only lead they have currently, is a ![]() dwarf living in east Keldagrim who expresses strange behaviour when the company is mentioned.
dwarf living in east Keldagrim who expresses strange behaviour when the company is mentioned.
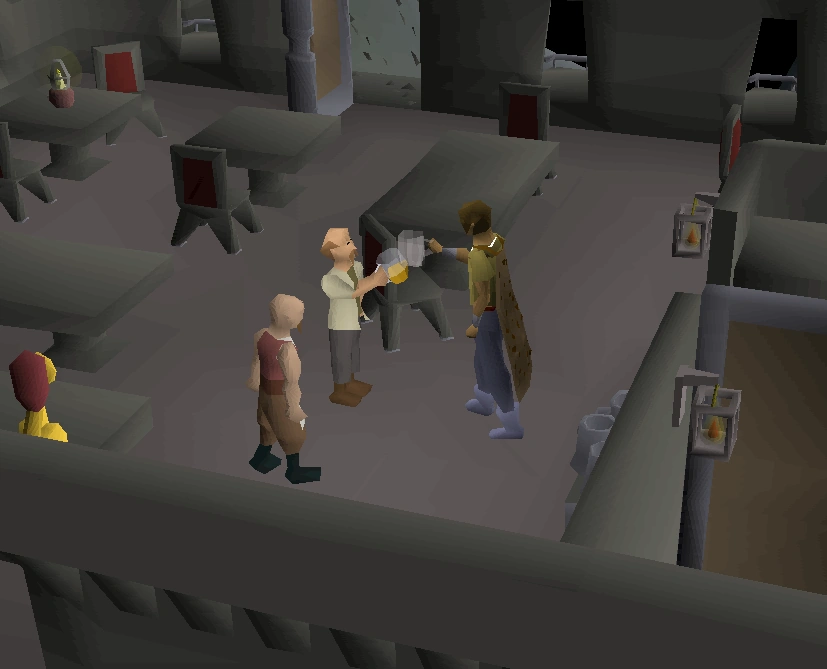
Agree to help Veldaban, and you will automatically be transported to the dwarf's house in east Keldagrim after a short cutscene. Speak to the dwarf, who is rather drunk and will ask you for a drink. Talk to him to give him the beer. Beer can be bought in the ![]() Laughing Miner or the
Laughing Miner or the ![]() King's Axe Inn for two coins. He, however, wants "some of the REALLY good stuff", which is an incredibly alcoholic drink called
King's Axe Inn for two coins. He, however, wants "some of the REALLY good stuff", which is an incredibly alcoholic drink called ![]() Kelda stout.
Kelda stout.
Getting the seeds
Items required: Random item (see below), 201 coins, dwarven stout (obtainable for free), and a beer (purchasable for 1 coin)
To make the drink, you need to grow some ![]() kelda hops from 4
kelda hops from 4 ![]() kelda seeds, possessed by some of his drunken friends - namely
kelda seeds, possessed by some of his drunken friends - namely ![]() Khorvak,
Khorvak, ![]() Gauss and the
Gauss and the ![]() rowdy dwarf.
rowdy dwarf.
Cheers!
- The
 drunken dwarf gives the first seed to set you off.
 - For the next seed, go to the
 Laughing Miner pub (directly south of the drunken dwarf's house) and you should see the
  Rowdy dwarf, circling around the pub. He asks you for a random item in exchange for another seed. See the list of items and how to obtain them below. Before teleporting outside of Keldagrim to obtain whatever item you're asked for (if needed), proceed to obtaining the next seed.
 - For the third seed, go to the west side of Keldagrim and talk to
 Gauss. He is in the King's Axe Inn, south of the bank in west Keldagrim. He will ask you to do a toast with him. Buy a beer and talk to him again to get the seed. After toasting him you can click off him and still get the seed without drinking the beer saving it for later.
 - To get the next seed, go to the White Wolf Mountain by using the mine carts. In the pub, talk to
 Khorvak, a dwarven engineer. Take a dwarven stout off the table, and give it to Khorvak to get the seed - or just talk him out of it. You "borrow" the seed as you manage to convince him that you will "return it"..
| A list of the items the Rowdy Dwarf may ask you for |
|---|
| Note: For the bucket of "camel poo", you need a
|
Brewing
Items required: 4 kelda seeds, rake (obtainable for free), seed dibber, spade, 2 buckets of water, 2 barley malt, pot (obtainable for free), 25 coins, beer glass
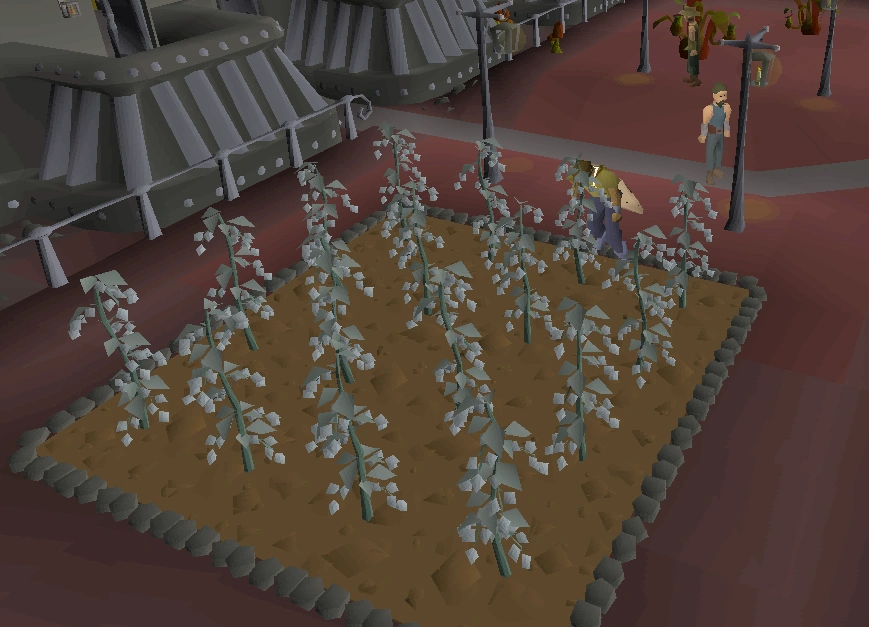
Harvesting the Kelda hops
Once you have all the four seeds, go to the hops farming plot in front of the palace in West ![]() Keldagrim and east of the bank. Ask
Keldagrim and east of the bank. Ask ![]() Rind the gardener for advice on planting the seeds there, and he tells you that for some reason, sunlight is harmful for kelda seeds and hence you can only grow it underground. He then gives you permission to use the
Rind the gardener for advice on planting the seeds there, and he tells you that for some reason, sunlight is harmful for kelda seeds and hence you can only grow it underground. He then gives you permission to use the ![]() Kelda hops patch.
Kelda hops patch.
Weed the garden using a rake, plant the hops, and wait 15-20 (likely around 18) minutes. You don't have to be online, but you'll get a notification when the hops are ready saying: Perhaps I should take a look and see if my Kelda hops have grown... The hops don't require attention or water and cannot get diseased, as they are known for having a remarkably fast growing speed.
If you need something to pass the time, you can talk to Rind the gardener and deliver a ![]() letter for him; you must take it to
letter for him; you must take it to ![]() Elstan, the gardener at the allotment south of
Elstan, the gardener at the allotment south of ![]() Falador (you can quickly reach him using the cabbage port from the
Falador (you can quickly reach him using the cabbage port from the ![]() Explorer's ring 2, 3, or 4), then go back to Keldagrim to Rind to get two
Explorer's ring 2, 3, or 4), then go back to Keldagrim to Rind to get two ![]() marrentill seeds.
marrentill seeds.
When your seeds have grown, pick the Kelda hops.
You now need to head to the bar in East Keldagrim and up the stairs to the ![]() fermenting vat. The vat at Port Phasmatys cannot be used; the vat will give the message, "These special hops need to be brewed in the Keldagrim brewery. Oh well..." If you already have contents in the fermenting vat bring 8 beer glasses or 2 calquat kegs to empty them. If the contents are still fermenting you can drain the vat by using the valve (whatever contents were fermenting in this vat will be lost).
fermenting vat. The vat at Port Phasmatys cannot be used; the vat will give the message, "These special hops need to be brewed in the Keldagrim brewery. Oh well..." If you already have contents in the fermenting vat bring 8 beer glasses or 2 calquat kegs to empty them. If the contents are still fermenting you can drain the vat by using the valve (whatever contents were fermenting in this vat will be lost).
If ready to brew the ale, use two ![]() buckets of water on the vat, then add two
buckets of water on the vat, then add two ![]() barley malt, then the
barley malt, then the ![]() kelda hops. Take the
kelda hops. Take the ![]() pot from the nearby table if you don't already have one and ask
pot from the nearby table if you don't already have one and ask ![]() Blandebir to fill it up with
Blandebir to fill it up with ![]() ale yeast for 25gp. Use the
ale yeast for 25gp. Use the ![]() ale yeast on the vat and the fermenting process will begin. This will take another 15–20 (likely 18) minutes and you will get a notification when it's ready.
ale yeast on the vat and the fermenting process will begin. This will take another 15–20 (likely 18) minutes and you will get a notification when it's ready.
When it's done fermenting, turn the valve and use a ![]() beer glass on the barrel. Head to the
beer glass on the barrel. Head to the ![]() Drunken Dwarf's house just north and talk about the
Drunken Dwarf's house just north and talk about the ![]() Red Axe. He will ask for the
Red Axe. He will ask for the ![]() Kelda stout and then tell you about the boarded up tunnel along with a small cutscene.
Kelda stout and then tell you about the boarded up tunnel along with a small cutscene.
Exploring the closed tunnel
Items required: None
Cart Conductor and the blocked passage
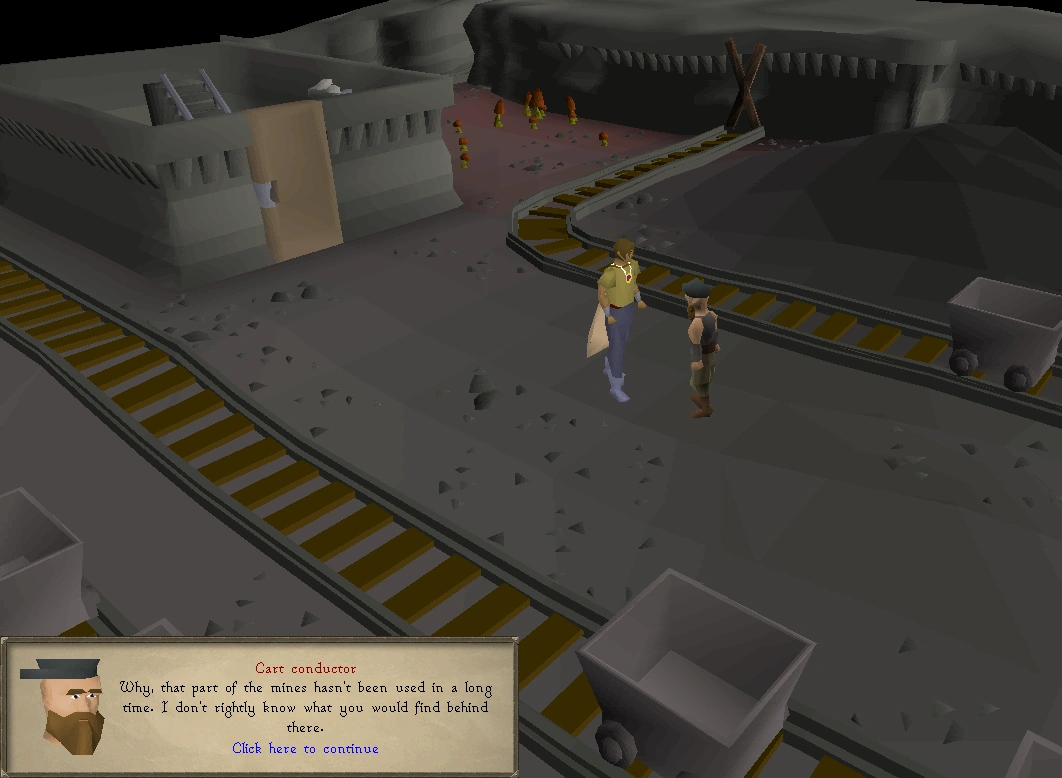
Talk to the ![]() cart conductor to the south at the train cart tracks (only one of the conductors will give you the option to ask about the closed off tunnel - see screenshot). Now, talk to the director of the mining company that you joined during
cart conductor to the south at the train cart tracks (only one of the conductors will give you the option to ask about the closed off tunnel - see screenshot). Now, talk to the director of the mining company that you joined during ![]() The Giant Dwarf quest, which is located upstairs in either the west or the east marketplace. Ask them for help with the boarded up tunnel, and they will have the boards removed at once. Go back to the conductor and ride the cart that goes into the new tunnel (the most southern cart, no ticket required).
The Giant Dwarf quest, which is located upstairs in either the west or the east marketplace. Ask them for help with the boarded up tunnel, and they will have the boards removed at once. Go back to the conductor and ride the cart that goes into the new tunnel (the most southern cart, no ticket required).
You will find yourself before a gigantic abyss at the end of the cart ride. A short cutscene shows the vastness of the area, along with tracks floating out in all directions.
If you log out at anytime while in the cave, you will be transported out in the city, and your progress will be saved.
Room 1
To proceed, you will need to head through one of the many exits on the other side of the chasm. First, you need to solve a puzzle to set the tracks to the exit. Collect the ![]() square stones from the box next to the controls, and set them in the dwarven machinery. A green stone will make the cart take the top path at a junction, and a yellow stone will make it take the bottom path.
square stones from the box next to the controls, and set them in the dwarven machinery. A green stone will make the cart take the top path at a junction, and a yellow stone will make it take the bottom path.
Your goal is to set up a connection between the red square all the way to the left and the boxes that are to the right. To place/rotate a stone in a junction, click once for green, twice for yellow, and three times to remove the stone. The green line shows the path the cart will take.
- To get past this room, operate the controls and place the yellow stone on the farthest spot to the left and the green stone one spot below that, as shown below. Hop onto the cart, and search the box on the platform that you reach to obtain another green
 square stone. Take the cart back to the control box.
 - There are two ways to go forward with the next one: either green, yellow, green or green, green, yellow. Ride the cart again, search the box for a second yellow stone, and return to the control box.
- Finally, connect the stones to the red cross, with the two yellow blocks on the left hand side and two green blocks on the right hand side. Ride the cart to reach the second room.
")
")
")
Room 2
Overhearing an important conversation...
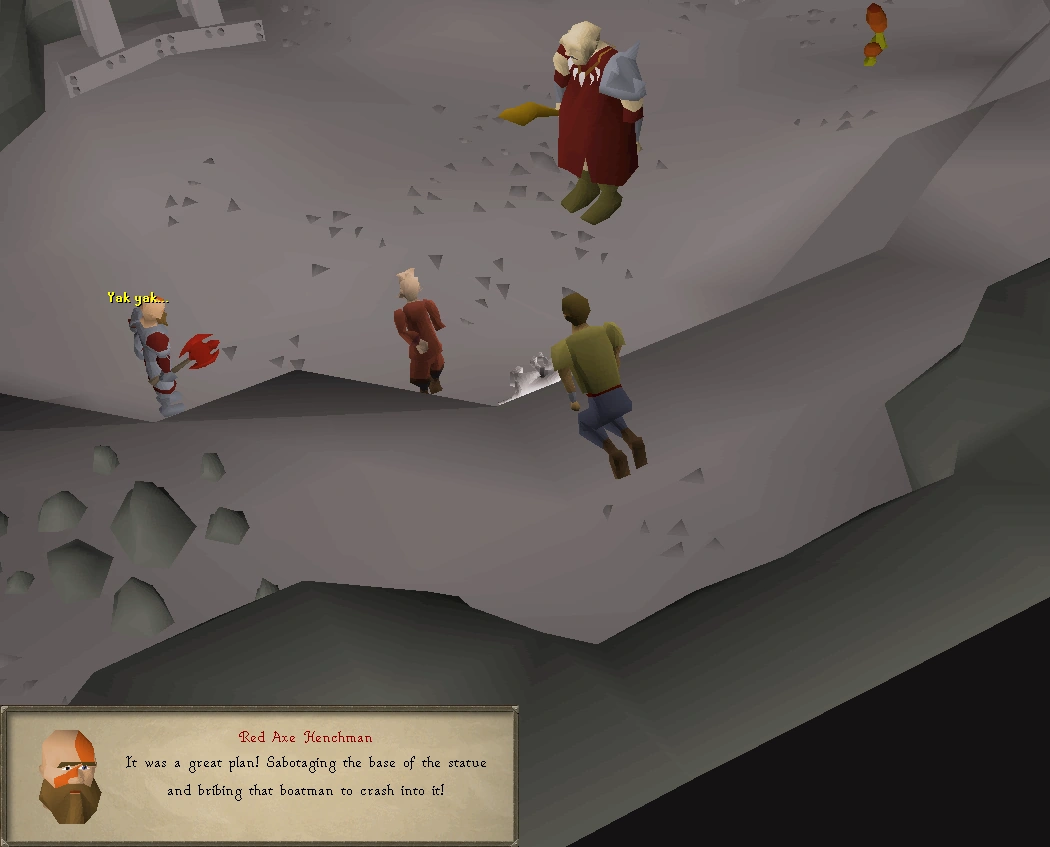
In this room, you eavesdrop on a conversation between ![]() Hreidmar (the Red Axe Director), an
Hreidmar (the Red Axe Director), an ![]() Ogre Shaman, and a
Ogre Shaman, and a ![]() Red Axe Henchman discussing their plans. You learn that
Red Axe Henchman discussing their plans. You learn that ![]() The Red Axe bribed the boatman into deliberately crashing into the statue so that they could blame it on a human in
The Red Axe bribed the boatman into deliberately crashing into the statue so that they could blame it on a human in ![]() The Giant Dwarf quest. Crawl through the hole at the opposite end of the room from where you entered.
The Giant Dwarf quest. Crawl through the hole at the opposite end of the room from where you entered.
Room 3
You'll now be in another mine cart abyss. Search the box to receive two yellow and one green stone.
- Put the green stone on the far left, a yellow one above it, and another yellow one to the right. Ride the cart, search the box, and ride back.
- Put a yellow stone at the far left, another yellow one spot below that, a green one below that, and another green to the right. Ride the cart, search the box, and ride back.
- Put a green stone on the far left, another green one spot above that, a yellow one spot above that, a green to the right and below, and a yellow to the right. Ride the cart into the fourth room.
")
")
")
Room 4
You appear in a small archive room, with a number of bookcases and crates, the ones with visible contents being searchable. Search the three crates. One contains papers concerning statistical data, salary structures, and shopping lists. The other two, however, are much more interesting. YOU MUST ALSO SEARCH A BOOKCASE BEFORE MOVING ON.
- There is a copy of a letter addressed to the dwarven boatman, signed by
 Colonel Grimsson. It speaks of the bribe, which was part of the plans you overheard earlier, so that the boatman takes along some gullible human on his boat to blame and destroy the statue of King Alvis:
| “ |
|
” |
— Regards, Colonel Grimsson of the Red Axe
|
- The other letter is a report on an exploring dwarf who entered the mines - your new buddy, the drunken dwarf - whose memory was wiped to avoid any risk:
| “ | Report on Intruder
|
” |
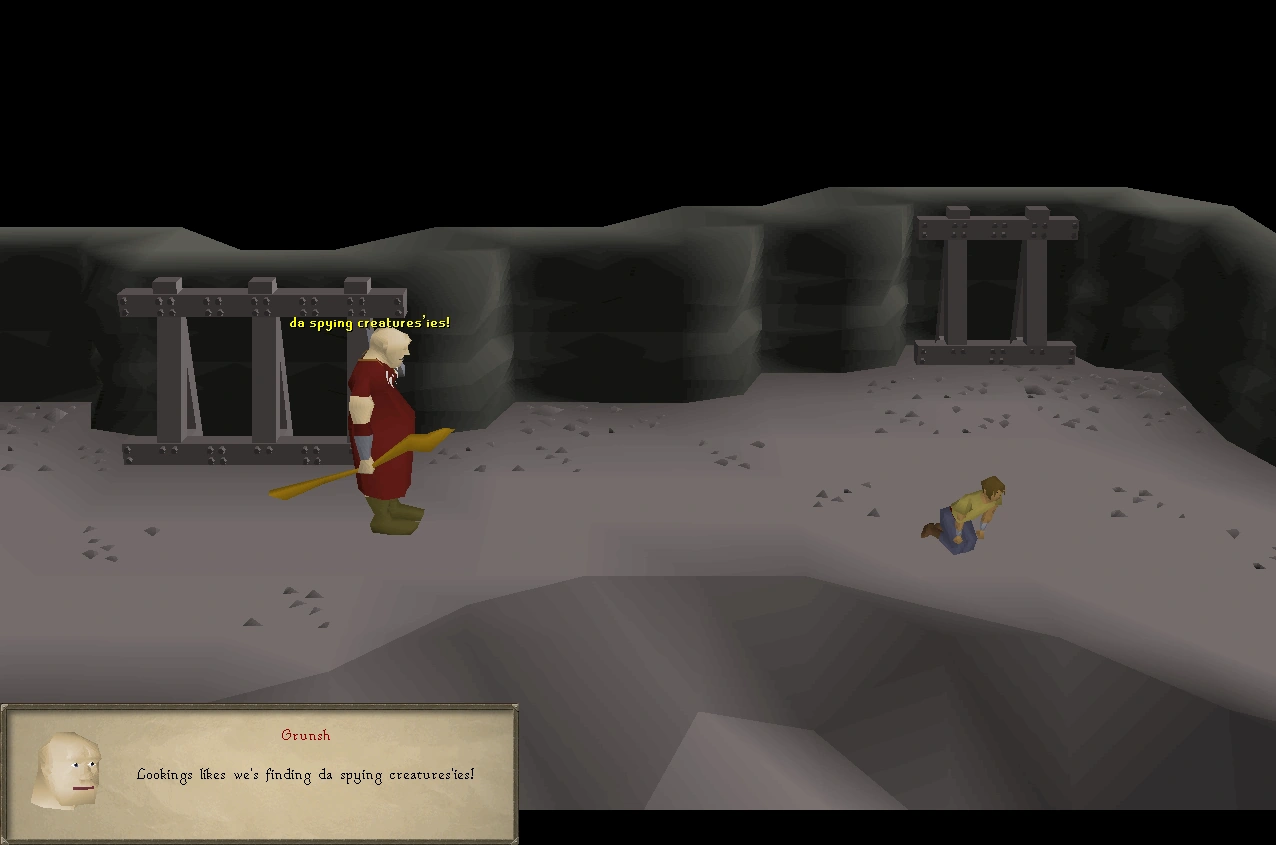
- One of the books in the bookcases contains information on Red Axe employees, in particular Colonel Grimsson and
 Grunsh, the Red Axe Henchman and ogre shaman encountered earlier:
| “ | Red Axe Employee Records
Information classified. Grimsson, the butcher of Barendir (employee #4297) Grimsson was once a soldier in the dwarven army and quickly made his way up the ranks, up to colonel. He served with the Black Guard at Ice Mountain and in Kandarin. He was present at the battle of Barendir when he fought against an army of trolls. It was here that he got his nickname, the Butcher of Barendir, as he mercilessly killed the trolls even as they retreated in defeat. Here, also, he got his distinctive scar running across his forehead in a hand-to-hand battle with a particularly ferocious troll. After this battle Grimsson became more and more aggressive, even to his fellow dwarves. Following a particularly vicious attack on a comrade, he was dismissed from the Black Guard. Soon after, he was recruited by the Red Axe. Here he's learned to control his rage and become even stronger. By now, he has become the right hand dwarf of the director. While he holds no official rank, he is still often affectionately referred to as 'The Colonel'. Grunsh, Ogre Shaman (employee #38262) Found lost and near death in the ice cold mountains above Keldagrim, Grunsh was nearly mistaken for a troll at first. Taken in by the Red Axe and nursed back to health, it turned out that he was in fact a powerful ogre shaman. Intelligent by ogre standards, and steadfastly loyal to his rescuers, he has taken up a prominent position in the ranks of the Red Axe. This is primarily due to the fact that since dwarves cannot use magic, they must rely on other races as spellcasters. Grunsh fits the bill perfectly. |
” |
Room 5
Moving forward from the reports room, you arrive at the final chasm. Search the box for two yellow and two green stones.
- Put a green stone on the far left, a green stone one above that, a yellow stone one above that, and a yellow one to the right. Ride, search, and ride back.
- Put a yellow stone on the far left, another yellow one below that, another yellow one below that, a green to the right, a green above that, and another green above that. Ride, search, and ride back.
- Put a green stone on the far left, another green one above that, a yellow one above that, a green to the right of that, a yellow above, a green below, a yellow above, then a yellow below. Ride to the sixth and final room.
")
")
")
Room 6
Hreidmar assembles his army.
The shaman casts a memory-erasing spell.
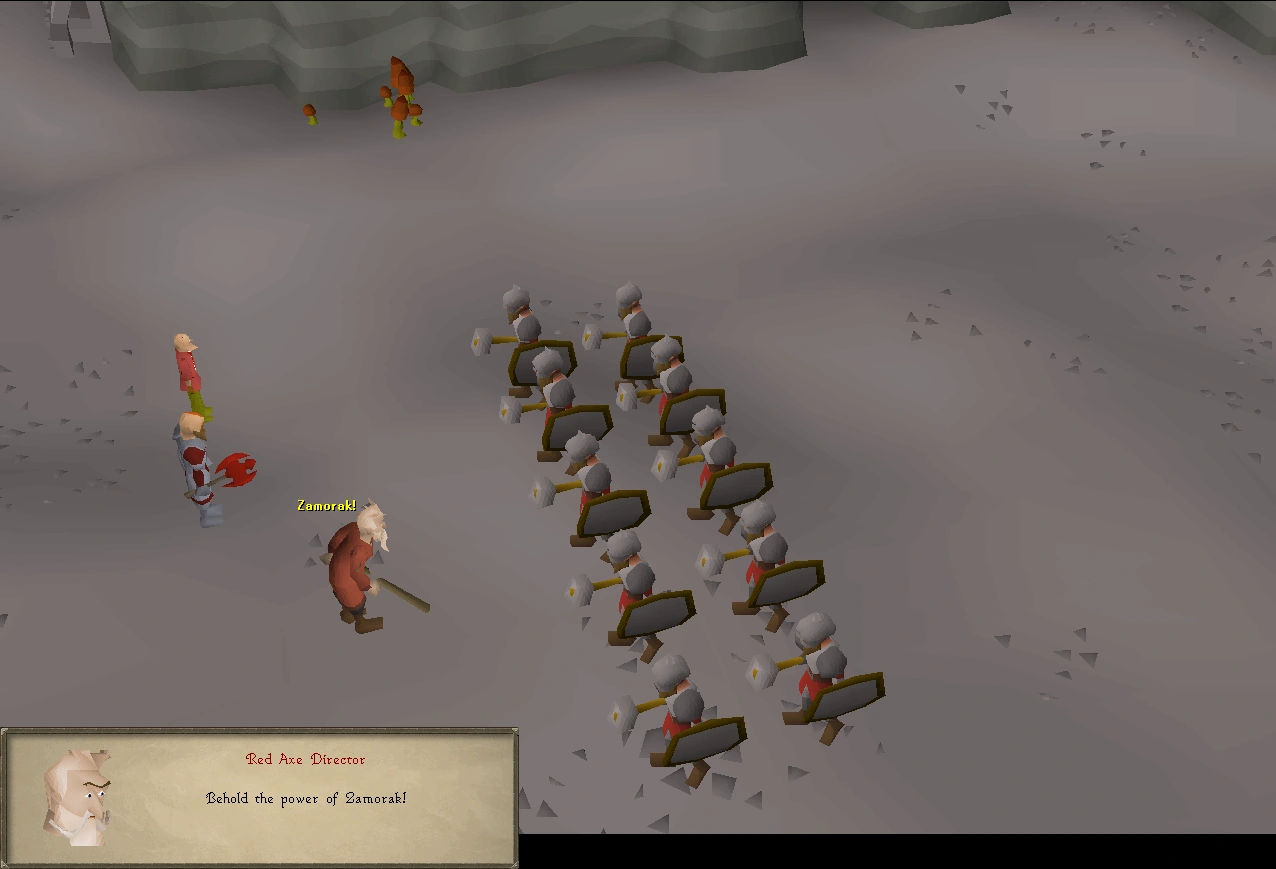
A cutscene starts, where the ![]() Red Axe Director will show off his army of
Red Axe Director will show off his army of ![]() Chaos Dwarves. But, before you can report to
Chaos Dwarves. But, before you can report to ![]() Commander Veldaban of what you've seen so far,
Commander Veldaban of what you've seen so far, ![]() Grunsh the Ogre shaman catches you prying into their plans and casts a spell that eliminates all your memories of the caves.
Grunsh the Ogre shaman catches you prying into their plans and casts a spell that eliminates all your memories of the caves.
Finishing
Items required: Kebab (purchase from kebab shop for 1 coin), beer (buy from barmaid for 2 coins)
Go back and talk to ![]() Commander Veldaban. (Note: Drinking the beer/eating the kebab before talking to Commander Veldaban will not initiate the cut scene.) You won't remember any of what had happened, but your instincts will tell you to go to the
Commander Veldaban. (Note: Drinking the beer/eating the kebab before talking to Commander Veldaban will not initiate the cut scene.) You won't remember any of what had happened, but your instincts will tell you to go to the ![]() Laughing Miner in east
Laughing Miner in east ![]() Keldagrim pub and have a beer and kebab. Buy a kebab from the store on the east side (directly south of the
Keldagrim pub and have a beer and kebab. Buy a kebab from the store on the east side (directly south of the ![]() drunken dwarf's house) and a beer from the pub. Now, drink the beer/eat the kebab in the pub to begin the final cutscene. You will get drunk and tell a nonsensical story to a bunch of drunken dwarves.
drunken dwarf's house) and a beer from the pub. Now, drink the beer/eat the kebab in the pub to begin the final cutscene. You will get drunk and tell a nonsensical story to a bunch of drunken dwarves.
")
")
")
Rewards
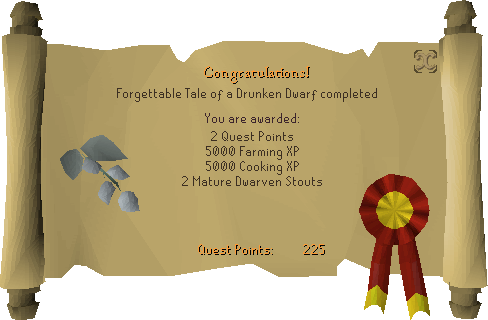
- 2
 Quest points
 - 5,000 Cooking experience
- 5,000 Farming experience
- 2 Dwarven stout (m)
Trivia
- Your quest journal will have revisions once an ogre shaman alters your memory:
- Hi hi hi ha ha ha ha.
- Lalalalalalalalala.
- Rock hot nice butterfly bad wolf sing song down the river.
- I saw... I saw... I saw kebabs? Wearing silly hats! Yes!
- AHAHAHAHA, I've gone totally mad! AHAHAHAHA!
- In regard to the failed plan to destroy the statue, the Red Axe Director exclaims "And we would have gotten away with it too, if it weren't for that pesky human!". This is a reference to the catch phrase used by every villain in the TV show, Scooby Doo.
- The Drunken Dwarf appears to become totally sober in his speech after he has been given
 Kelda stout by the player.
 - If the player attempts to drink the Kelda stout, they will remark how vile it is and suggest they take it back to their "drunken, kebab-obsessed friend."
- During the cut scene in the pub where your player appears to be sitting on a chair with a beer glass in hand. The chair and beer glass are actual items that are automatically equipped in the shield and weapon slots for the duration of the cut scene.
- If you have changed your gender from female to male between the Giant Dwarf and this quest, your company director will comment how you "look a little masculine today".
Forgettable Tale... | |||||
|---|---|---|---|---|---|
| NPCs |
| ||||
| Items |
| ||||
| Music | |||||
| Related | |||||